Battery switch on travel trailer function is crucial for managing your RV’s power. This guide will walk you through understanding its purpose, different types, safe operation, troubleshooting, and maintenance. We’ll cover everything from connecting and disconnecting batteries safely to understanding how it interacts with your RV’s entire electrical system, including shore power, generators, and solar panels. Get ready to become a battery switch pro!
We’ll explore the various types of switches (like 1-2-both and 1-2-off), detailing their operation and the benefits of each. Learn how to prevent common issues like blown fuses and power outages, and even how to test your switch with a multimeter. This isn’t just about flipping a switch; it’s about understanding the whole electrical picture in your travel trailer and maximizing your battery life.
Understanding Battery Switch Functionality in Travel Trailers
A battery switch is a crucial component in your travel trailer’s electrical system, allowing you to control the flow of power from your trailer batteries. Understanding its function and proper operation is essential for preventing electrical issues and maximizing battery life. This ensures you have power when you need it and avoids potentially damaging your electrical system.
The primary purpose of a battery switch is to isolate your house batteries from the rest of the electrical system. This is vital for several reasons, including preventing battery drain when your trailer is stored, allowing you to charge different battery banks independently, and providing a safety mechanism in case of electrical faults.
Battery Switch Types
Travel trailers typically utilize one of two main types of battery switches: 1-2-Both and 1-2-Off. A 1-2-Both switch allows you to select power from either battery bank (Battery 1 or Battery 2), both banks simultaneously, or to completely disconnect both banks. A 1-2-Off switch offers the same selection of Battery 1, Battery 2, or Both, but adds a crucial “Off” position that completely isolates both batteries from the trailer’s electrical system, preventing any drain whatsoever.
So, you’re prepping for your next adventure in your travel trailer? First things first: make sure you understand the battery switch on travel trailer function ; it’s crucial for keeping your lights and appliances running. Once that’s sorted, think about your entertainment. A killer audiophile travel setup can really elevate the experience, transforming those quiet nights into mini-concerts.
Just remember to pack accordingly!
Choosing the right switch depends on your specific needs and setup.
So, you’re prepping for a road trip? Awesome! First things first: understand your travel trailer’s power. Check out this guide on the battery switch on travel trailer function to avoid any dead-battery surprises. Once you’ve got the power sorted, it’s time to think about entertainment. If you’re an audiophile, setting up a killer sound system is key, and you’ll want to check out this resource on audiophile travel aetup for tips on portable hi-fi solutions.
Happy travels!
Operating a Battery Switch
Proper operation of your battery switch is straightforward, but crucial for maintaining your trailer’s electrical system. Before attempting any operation, ensure the switch is clearly labeled, and if you’re unsure, consult your trailer’s manual.
- Identify the switch positions: Locate the switch clearly marked with positions like “1,” “2,” “Both,” and “Off” (if applicable). Understand what each position does. For example, “1” might connect only the first battery bank to the trailer’s circuits.
- Turn the switch to the desired position: Carefully rotate the switch handle to the appropriate position based on your needs. If charging a single battery bank, select the corresponding number. To use both banks simultaneously, select “Both.” To completely disconnect the batteries, select “Off” (if available).
- Verify functionality: After switching, check that the intended power sources are active or inactive, as expected. For instance, if you selected “1,” check if only the devices connected to Battery 1 are functioning.
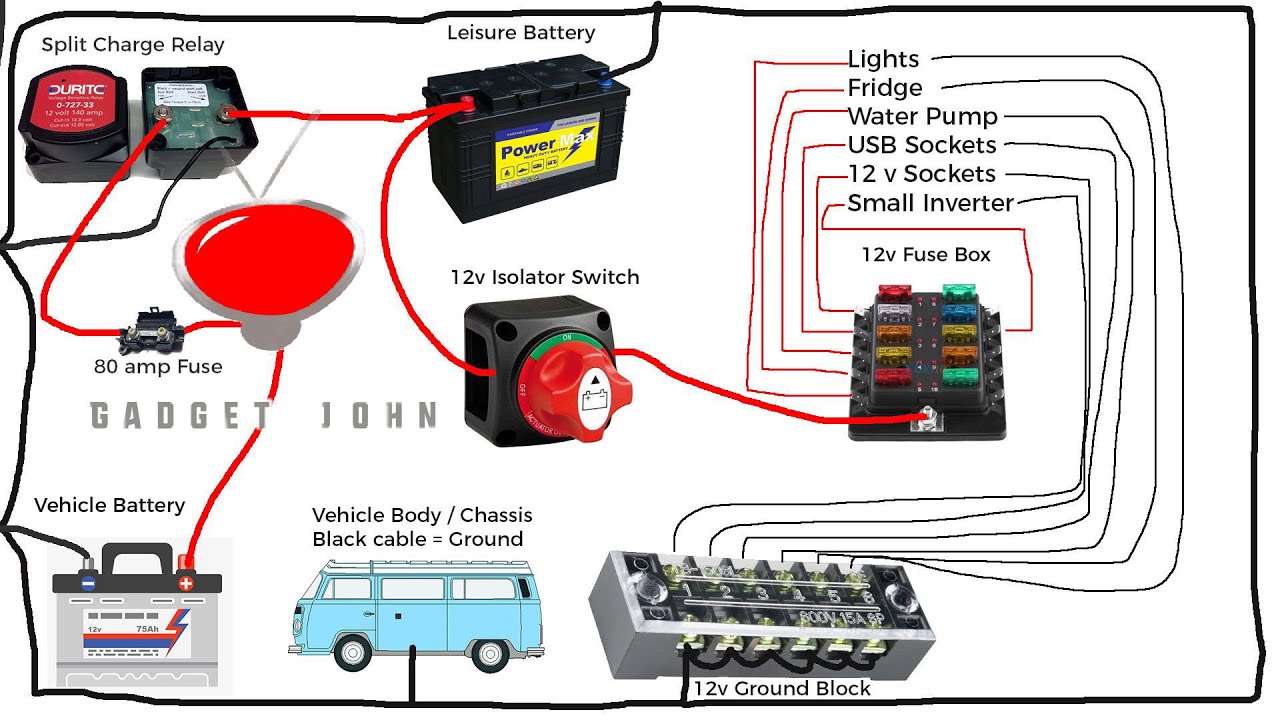
Battery Switch Wiring Diagram
A simple diagram can illustrate how a battery switch functions. Imagine two batteries (Battery 1 and Battery 2) connected to a three-position (1-2-Both) switch. The switch acts as a selector, connecting the positive terminal of either Battery 1, Battery 2, or both, to the main power bus of your trailer’s electrical system. The negative terminals of both batteries are usually permanently connected to the negative bus.
The diagram would show:
• Two battery symbols (Battery 1 and Battery 2), each with a positive (+) and negative (-) terminal.
• A three-position switch with labels “1,” “2,” and “Both.”
• Lines representing the wiring connecting the batteries to the switch, and the switch to the positive (+) and negative (-) buses of the trailer’s electrical system.
When the switch is in the “1” position, only Battery 1 is connected to the main power bus. In the “2” position, only Battery 2 is connected. In the “Both” position, both batteries are connected in parallel to the main power bus, effectively doubling the available power. The negative terminals are always connected to the negative bus, providing a complete circuit.
Connecting and Disconnecting Batteries
Connecting and disconnecting your travel trailer’s house battery is a straightforward process, but safety is paramount. Improper handling can lead to serious consequences, including injury and damage to your RV’s electrical system. This section details the correct procedures and crucial safety precautions.Connecting and disconnecting your house battery involves working with potentially dangerous electrical currents and corrosive chemicals. Always prioritize safety to avoid accidents and ensure the longevity of your battery.
Safety Precautions When Handling RV Batteries
Before you begin any work with your RV batteries, it’s vital to take appropriate safety measures. RV batteries produce hydrogen gas, which is highly flammable and explosive. Good ventilation is crucial to prevent the buildup of this gas. Always wear safety glasses or goggles to protect your eyes from splashes of battery acid, which can cause serious burns.
Additionally, wear gloves to protect your hands from acid and corrosion. Never smoke or use open flames near batteries.
Connecting the House Battery
The process of connecting the house battery is typically done through a battery disconnect switch. This switch is usually located near the battery and allows you to easily cut power to the battery. Before connecting the battery, ensure the disconnect switch is in the “off” position. Then, carefully connect the positive (+) cable to the positive terminal and the negative (-) cable to the negative terminal.
Tighten the cable clamps securely to ensure a good connection. Finally, turn the disconnect switch to the “on” position.
Disconnecting the House Battery
Disconnecting the house battery follows a similar process, but in reverse order. First, turn the disconnect switch to the “off” position. Then, carefully disconnect the negative (-) cable from the negative terminal, followed by the positive (+) cable from the positive terminal. Always disconnect the negative cable first to prevent accidental short circuits. After disconnecting, store the cables safely to prevent accidental contact or damage.
Consequences of Incorrect Battery Connection
Connecting the battery cables incorrectly can lead to several negative consequences. A reversed connection (positive to negative, and vice-versa) can cause sparks, damage to electrical components, and even a fire. Loose connections can lead to poor performance, overheating, and premature battery failure. Acid spills from improper handling can cause corrosion and damage to surrounding components. Always double-check your connections before turning on the disconnect switch.
Battery Handling Checklist
Before working with your RV batteries, always follow this checklist:
- Ensure adequate ventilation.
- Wear safety glasses or goggles.
- Wear gloves.
- Have baking soda and water on hand for neutralizing spills (acid spills should be neutralized immediately with baking soda and water).
- Inspect the battery terminals for corrosion and clean them if necessary.
- Verify the disconnect switch is in the “off” position before connecting or disconnecting cables.
- Connect the positive cable first, then the negative.
- Disconnect the negative cable first, then the positive.
- Tighten all connections securely.
- Inspect all connections after completing the process.
Troubleshooting Common Battery Switch Issues
Dealing with a faulty battery switch in your travel trailer can be frustrating, leaving you without power when you need it most. Fortunately, many common problems are easily diagnosed and fixed with a little troubleshooting. This section will guide you through identifying, diagnosing, and resolving these issues.
Identifying Common Battery Switch Problems
Several issues can arise with your battery switch, resulting in a lack of power to your trailer’s appliances. These problems range from simple blown fuses to more complex internal switch failures. Understanding the potential causes helps in effective troubleshooting. Common symptoms include no power to the trailer’s 12V system, flickering lights, or certain appliances not working while others do.
A blown fuse is often a simple, easily-solved cause of these symptoms. Another common problem is corrosion on the battery terminals or within the switch itself, impeding the flow of electricity.
Troubleshooting Steps for a Malfunctioning Battery Switch
Before you start, always disconnect the negative battery terminal to ensure safety. Begin by visually inspecting the switch itself, looking for signs of damage, corrosion, or loose connections. Check all fuses associated with the battery switch and replace any blown fuses with fuses of the correct amperage. If the problem persists, it’s time to test the switch’s functionality.
Testing a Battery Switch with a Multimeter
A multimeter is an invaluable tool for testing the battery switch. First, set your multimeter to measure DC voltage. Connect the positive lead of the multimeter to the positive terminal of the battery and the negative lead to the negative terminal. You should get a reading that matches your battery’s voltage. Then, turn the battery switch to the position that should provide power to your trailer.
Re-check the voltage at the output terminals of the switch. If the voltage is significantly lower than the battery’s voltage or shows zero volts, the switch is likely faulty. If the voltage reading is consistent with the battery voltage, the problem lies elsewhere in the trailer’s electrical system.
Troubleshooting Table: Battery Switch Problems
| Problem | Possible Cause | Solution | Prevention |
|---|---|---|---|
| No power to trailer | Blown fuse | Replace the fuse with one of the correct amperage. | Regularly inspect fuses and replace any showing signs of wear. |
| No power to trailer | Corroded battery terminals or switch connections | Clean terminals and connections with a wire brush and baking soda solution. | Apply anti-corrosion grease to terminals and connections. |
| Intermittent power | Loose connections | Tighten all connections at the battery, switch, and distribution panel. | Regularly check for tightness of all connections. |
| No power to trailer | Faulty battery switch | Replace the battery switch. | Choose a high-quality, well-rated switch. |
| Low voltage at trailer | Weak battery | Charge or replace the battery. | Regularly check battery voltage and charge as needed. |
Battery Switch Maintenance and Replacement: Battery Switch On Travel Trailer Function

Keeping your travel trailer’s battery switch in good working order is crucial for reliable power. Regular maintenance prevents problems and extends the lifespan of the switch, saving you time and money in the long run. Neglecting maintenance can lead to corrosion, poor connections, and ultimately, switch failure, leaving you stranded without power.
Battery Switch Maintenance Schedule
A simple maintenance schedule can significantly improve the lifespan and performance of your battery switch. It’s recommended to inspect your battery switch at least twice a year, before and after extended storage periods. More frequent inspections are advisable if you frequently use your travel trailer in harsh environments (e.g., coastal areas with high salinity or areas with heavy dust).
A thorough cleaning and inspection should be performed annually.
Cleaning and Inspecting the Battery Switch, Battery switch on travel trailer function
Before starting any work, always disconnect the negative battery terminal to prevent accidental short circuits. Use a wire brush or sandpaper to clean any corrosion from the battery switch terminals and the connecting wires. Pay close attention to the areas where the wires connect to the switch. Inspect the switch itself for any signs of damage, such as cracks, loose components, or excessive wear.
If you find any significant damage, replacement is recommended. After cleaning, apply a thin layer of dielectric grease to the terminals to help prevent future corrosion. This grease acts as a barrier against moisture and other contaminants.
Replacing a Faulty Battery Switch
Replacing a battery switch is a relatively straightforward process, but it requires careful attention to detail. Before starting, always disconnect the negative battery terminal. Take photos of the wiring configuration before disconnecting any wires to help with reassembly. Note the position of each wire on the switch.
- Step 1: Disconnect the Batteries: Disconnect the negative (-) terminal from both batteries. This is crucial for safety to prevent accidental short circuits.
- Step 2: Disconnect the Wiring: Carefully disconnect all wires from the old battery switch. Use a pen or marker to label each wire to aid in reassembly. A photo is also helpful.
- Step 3: Remove the Old Switch: Remove the old battery switch from its mounting location. This may involve removing screws or bolts. Note the orientation of the switch before removal.
- Step 4: Install the New Switch: Mount the new battery switch in the same location as the old one. Ensure it’s securely fastened.
- Step 5: Reconnect the Wiring: Reconnect the wires to the new switch, matching them to the labels or photo you created earlier. Double-check your connections to ensure accuracy.
- Step 6: Reconnect the Batteries: Reconnect the negative (-) terminals to both batteries. Then, reconnect the positive (+) terminals.
- Step 7: Test the Switch: Test the switch to ensure it’s functioning correctly. Check all battery connections for proper voltage.
Mastering your travel trailer’s battery switch is key to a smooth and enjoyable RV experience. By understanding its function, performing regular maintenance, and knowing how to troubleshoot common problems, you’ll ensure reliable power and extend the life of your batteries and other electrical components. So, grab your multimeter, familiarize yourself with your switch, and hit the road with confidence!
Top FAQs
What happens if I leave the battery switch in the “off” position for an extended period?
Leaving the switch off for a long time won’t damage the switch itself, but it will prevent your house battery from charging. This means you’ll drain it if you use any 12V appliances.
Can I use a battery switch from a different RV in my trailer?
Possibly, but it depends on the amperage rating and the wiring configuration. Always check the specifications to ensure compatibility. Using an incorrect switch could lead to damage or even fire.
How often should I clean my battery switch?
At least once a year, or more often if you notice corrosion. Clean corrosion with a wire brush and baking soda solution.
My battery switch feels hot to the touch. Is that normal?
No, a hot battery switch indicates a problem. Turn it off immediately and check for loose connections or a faulty switch. High heat could indicate an electrical short.
